Setup progress 0 / 0

Do-it-yourself tracking setup · 2026 interfaces

Make every form submission on your site count as a lead.

One container, three platforms, eight steps. Work down the page in order, tick each box as you go, and by the end your contact form will report a real conversion into Google Analytics 4 and Meta Ads — not a guess based on page views.

Google Tag Manager Google Analytics 4 Meta Pixel
Time needed
60–90 minutes
Skill level
No coding, one copy-paste
You will need
Admin access to your site
End result
generate_lead + Lead events

Phase 00

Before you start

Chasing access halfway through is what turns a one-hour job into a one-week job. Get all six of these in hand first.

Your reference card

Keep your three IDs here

Type each ID in as you collect it. Every code snippet further down this page updates to use your real IDs, so you can copy and paste straight into your site. These stay in your browser only — nothing is sent anywhere.

A GTM ID always starts GTM-. A GA4 measurement ID always starts G- — if yours starts UA- you are looking at old Universal Analytics, which stopped collecting data in 2023. A Meta pixel ID is 15 or 16 digits with no letters.

The build

Eight steps, in this order

The order matters: each step depends on the one above it. The coloured rule above each number tells you which platform you are working in.

01
In Google Tag Manager~10 min

Create your container and install it on the site

Tag Manager is the box that holds every other tracking tag. Install it once and you will never touch your website's code again for tracking.

  1. Go to tagmanager.google.com and click Create account.
  2. Account name: your company name. Container name: your domain, e.g. example.com. Target platform: Web.
  3. Accept the terms. GTM immediately shows you two code snippets — that is your install code.
  4. Copy your container ID (top right, looks like GTM-ABC1234) into the reference card above.
  5. Paste snippet one immediately after the opening <head> tag of every page, and snippet two immediately after the opening <body> tag.
Paste high in <head>
<!-- Google Tag Manager -->
<script>(function(w,d,s,l,i){w[l]=w[l]||[];w[l].push({'gtm.start':
new Date().getTime(),event:'gtm.js'});var f=d.getElementsByTagName(s)[0],
j=d.createElement(s),dl=l!='dataLayer'?'&l='+l:'';j.async=true;j.src=
'https://www.googletagmanager.com/gtm.js?id='+i+dl;f.parentNode.insertBefore(j,f);
})(window,document,'script','dataLayer','GTM-XXXXXXX');</script>
<!-- End Google Tag Manager -->
Paste right after <body>
<!-- Google Tag Manager (noscript) -->
<noscript><iframe src="https://www.googletagmanager.com/ns.html?id=GTM-XXXXXXX"
height="0" width="0" style="display:none;visibility:hidden"></iframe></noscript>
<!-- End Google Tag Manager (noscript) -->
On WordPress? Skip the copy-paste. Install the free GTM4WP plugin, put your container ID in its settings, and it places both snippets correctly. On Shopify, use Online Store → Themes → Edit code → theme.liquid.
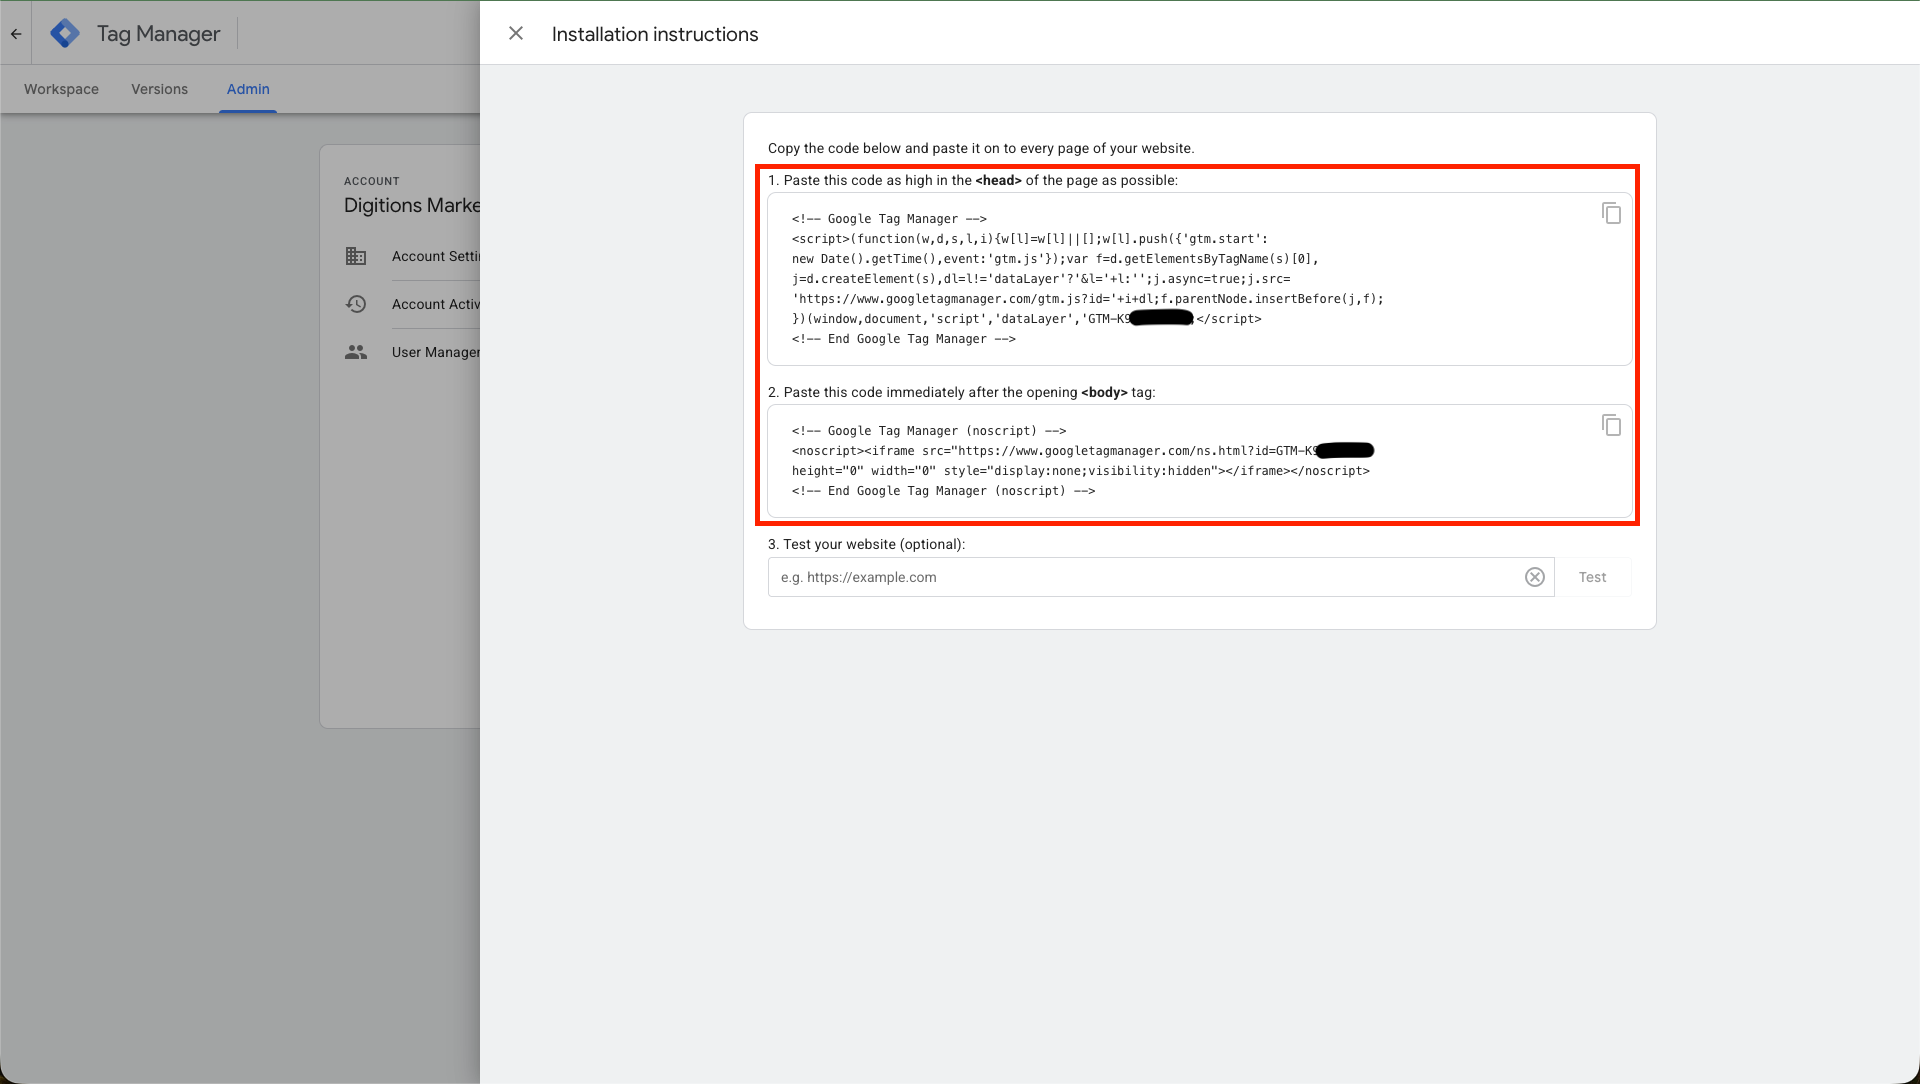
Google Tag Manager, Admin tab, Install Google Tag Manager panel. Two code blocks are outlined in red: the script snippet for the head of the page, and the noscript iframe snippet for immediately after the opening body tag. Open full size ↗
What you should see: two grey code boxes with your GTM- ID visible in both.
02
In Google Analytics~10 min

Create the GA4 property and connect it through GTM

Do not paste the GA4 code onto your site. Fire it from Tag Manager instead, so everything sits in one place and you can debug it.

  1. At analytics.google.com, create a property, then a Web data stream for your domain.
  2. Copy the measurement ID (G- followed by ten characters) into the reference card above.
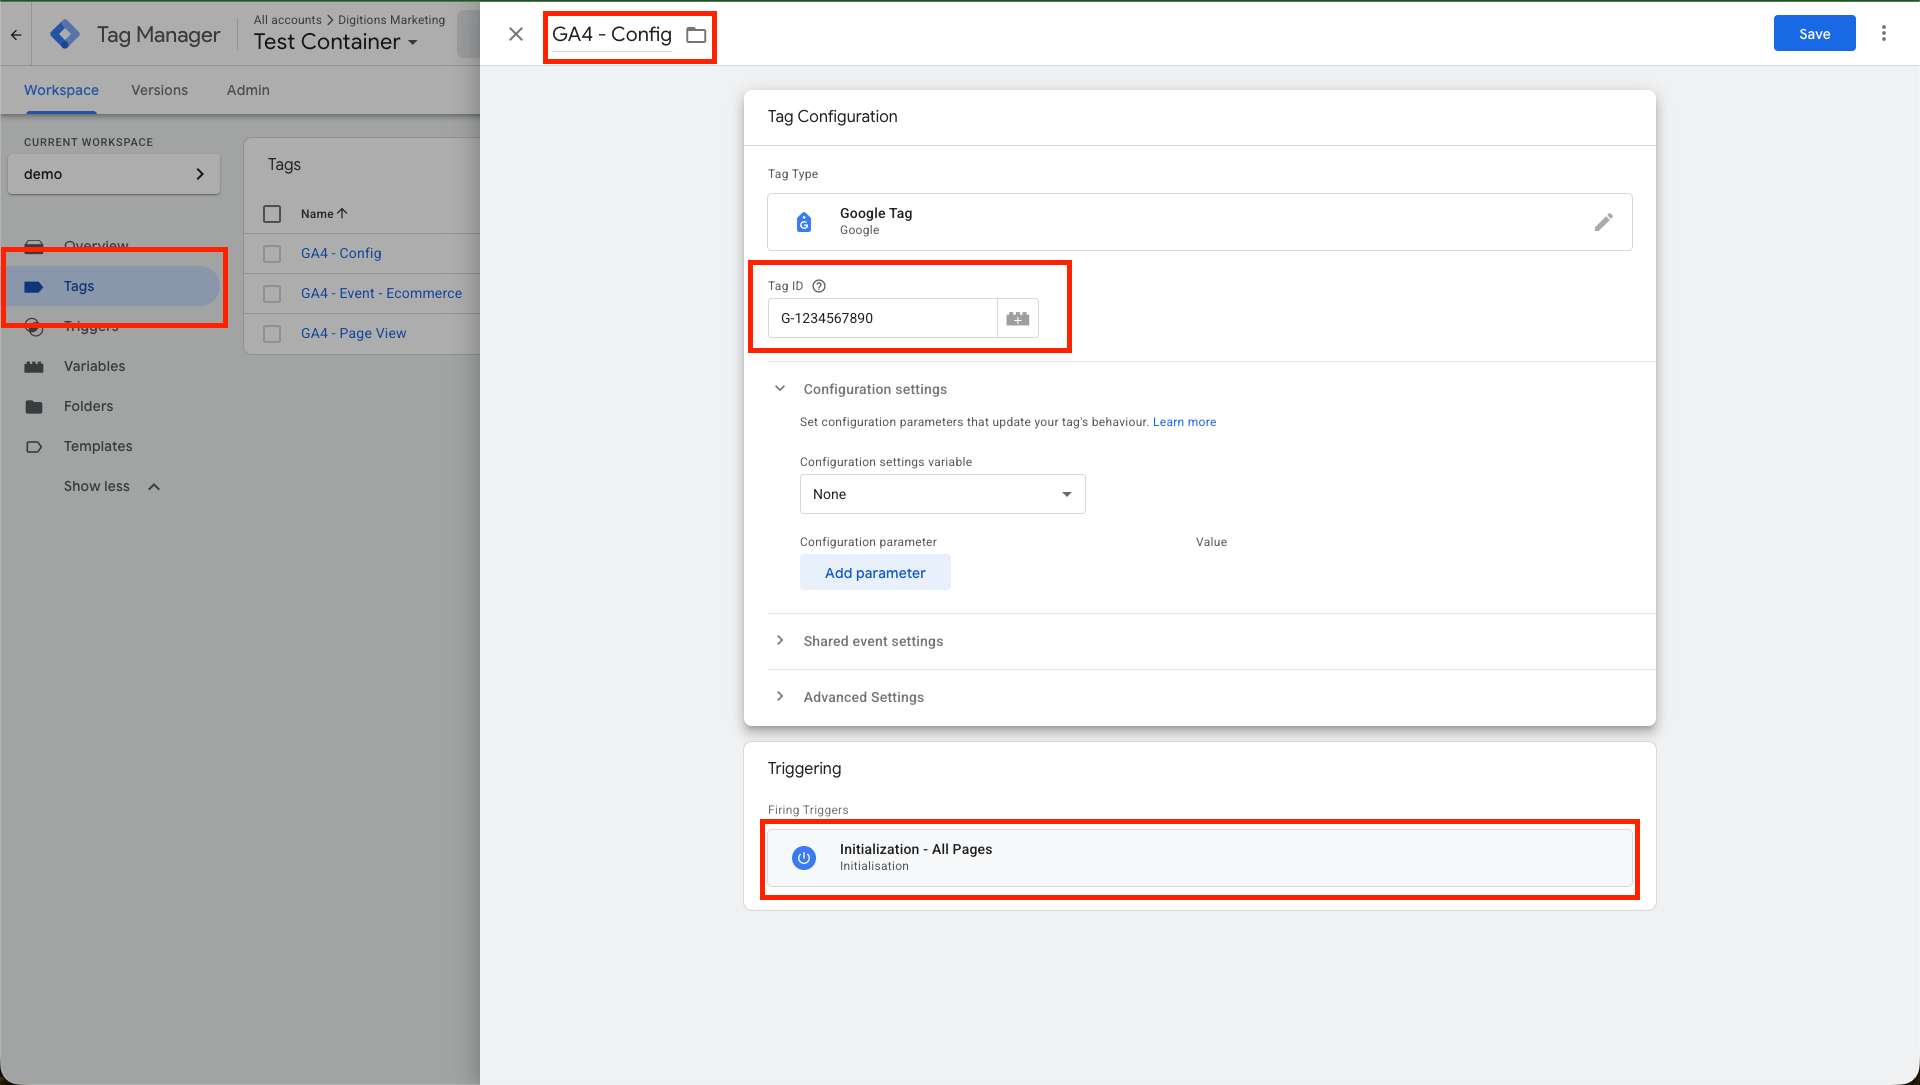
  3. Back in GTM: Tags → New → Google Tag. Paste the measurement ID into the Tag ID field.
  4. Trigger: Initialization — All Pages. Name it GA4 — Config and save.
  5. In GA4, turn on Enhanced measurement on the stream so scrolls, outbound clicks and file downloads track themselves.
Do not double-install. If your theme or an SEO plugin already has a GA4 field filled in, empty it. Two installs means every session, page view and lead is counted twice.
The GTM tag editor for a tag named GA4 - Config. Tag type is Google Tag, the Tag ID field holds a G- measurement ID, and the firing trigger is Initialization - All Pages. All three are outlined in red. Open full size ↗
What you should see: Tag type “Google Tag”, your G- ID, one trigger attached.
03
In Meta Events Manager~10 min

Create the Meta pixel and load it from GTM

The pixel needs to load on every page before it can report a lead on one of them. Same principle as GA4: one tag, all pages, managed in GTM. Two ways to do it — pick a lane and the rest of this page follows you.

  1. Open Events ManagerConnect data sourceWeb → name it after your domain.
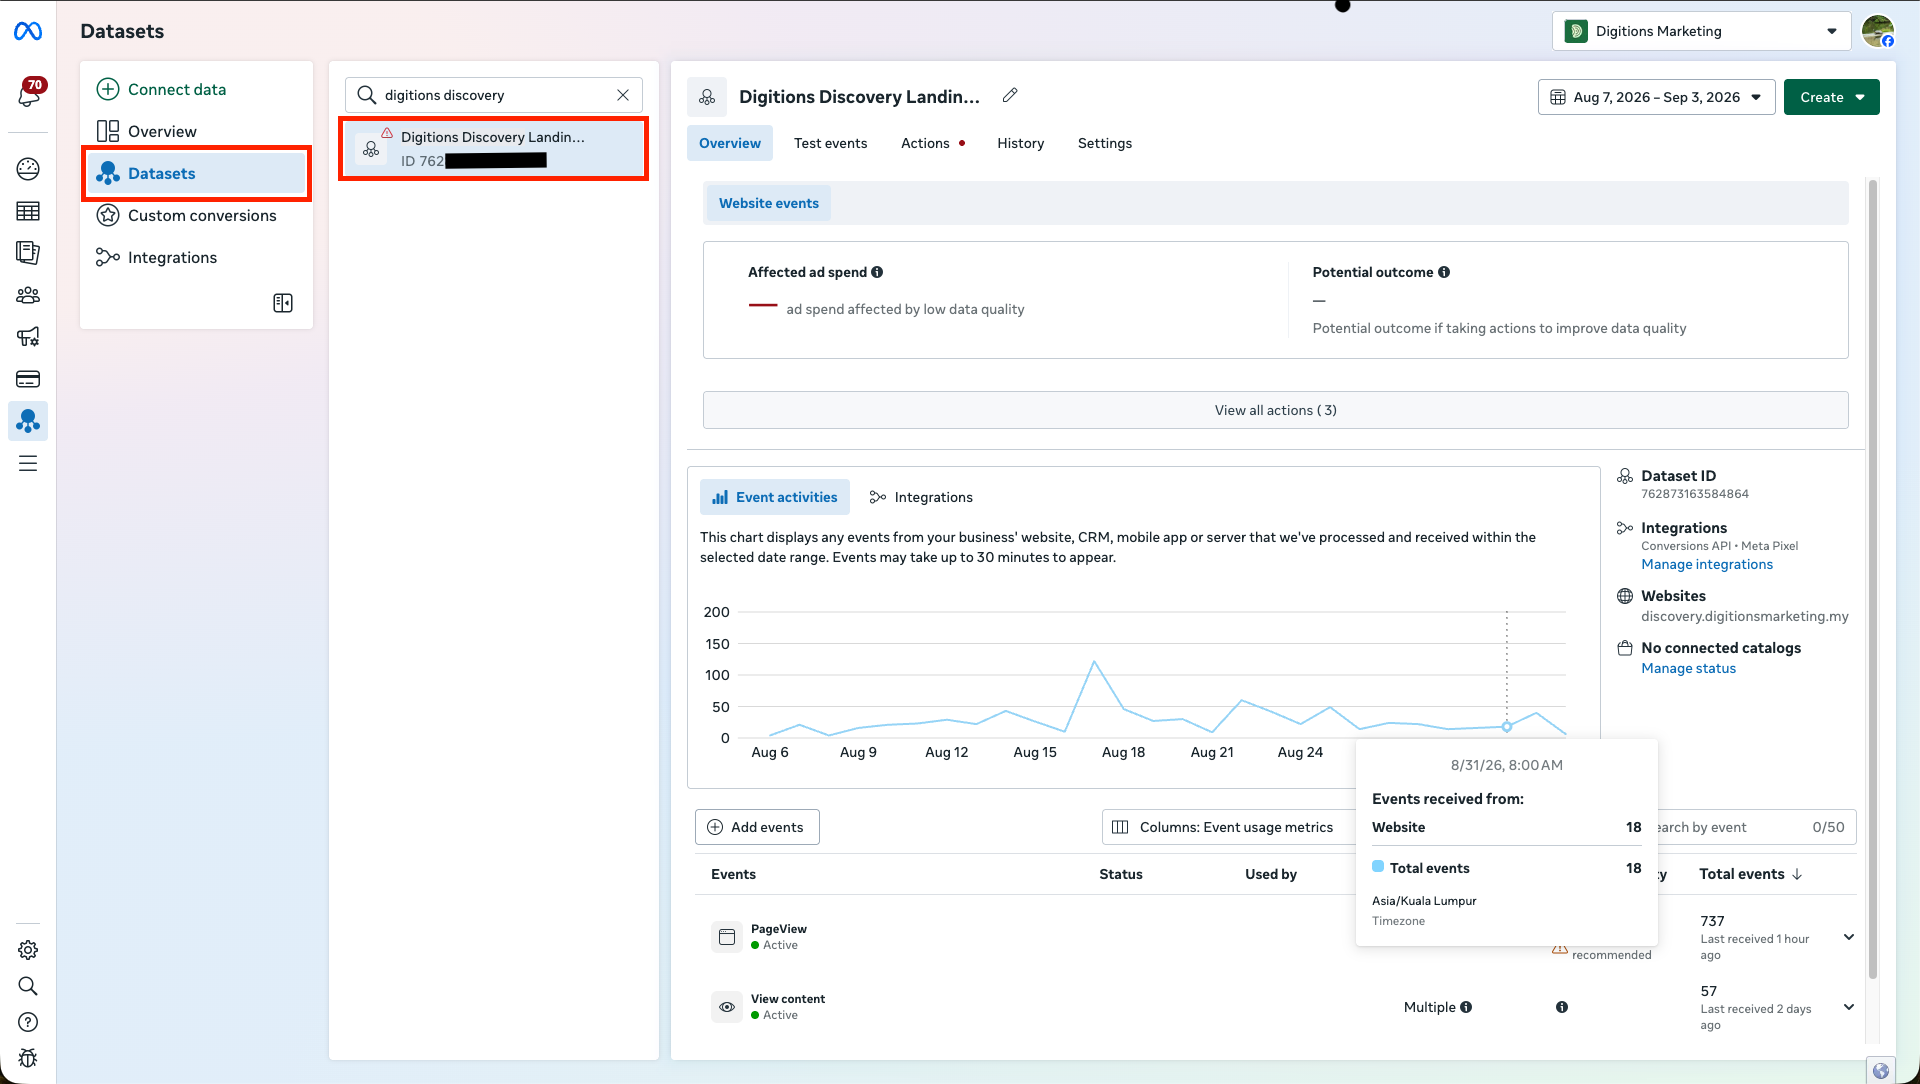
  2. Copy the 15–16 digit dataset (pixel) ID into the reference card above.
  3. Verify your domain in Meta Business Settings → Brand safety → Domains. Without this, iOS traffic reporting degrades badly.
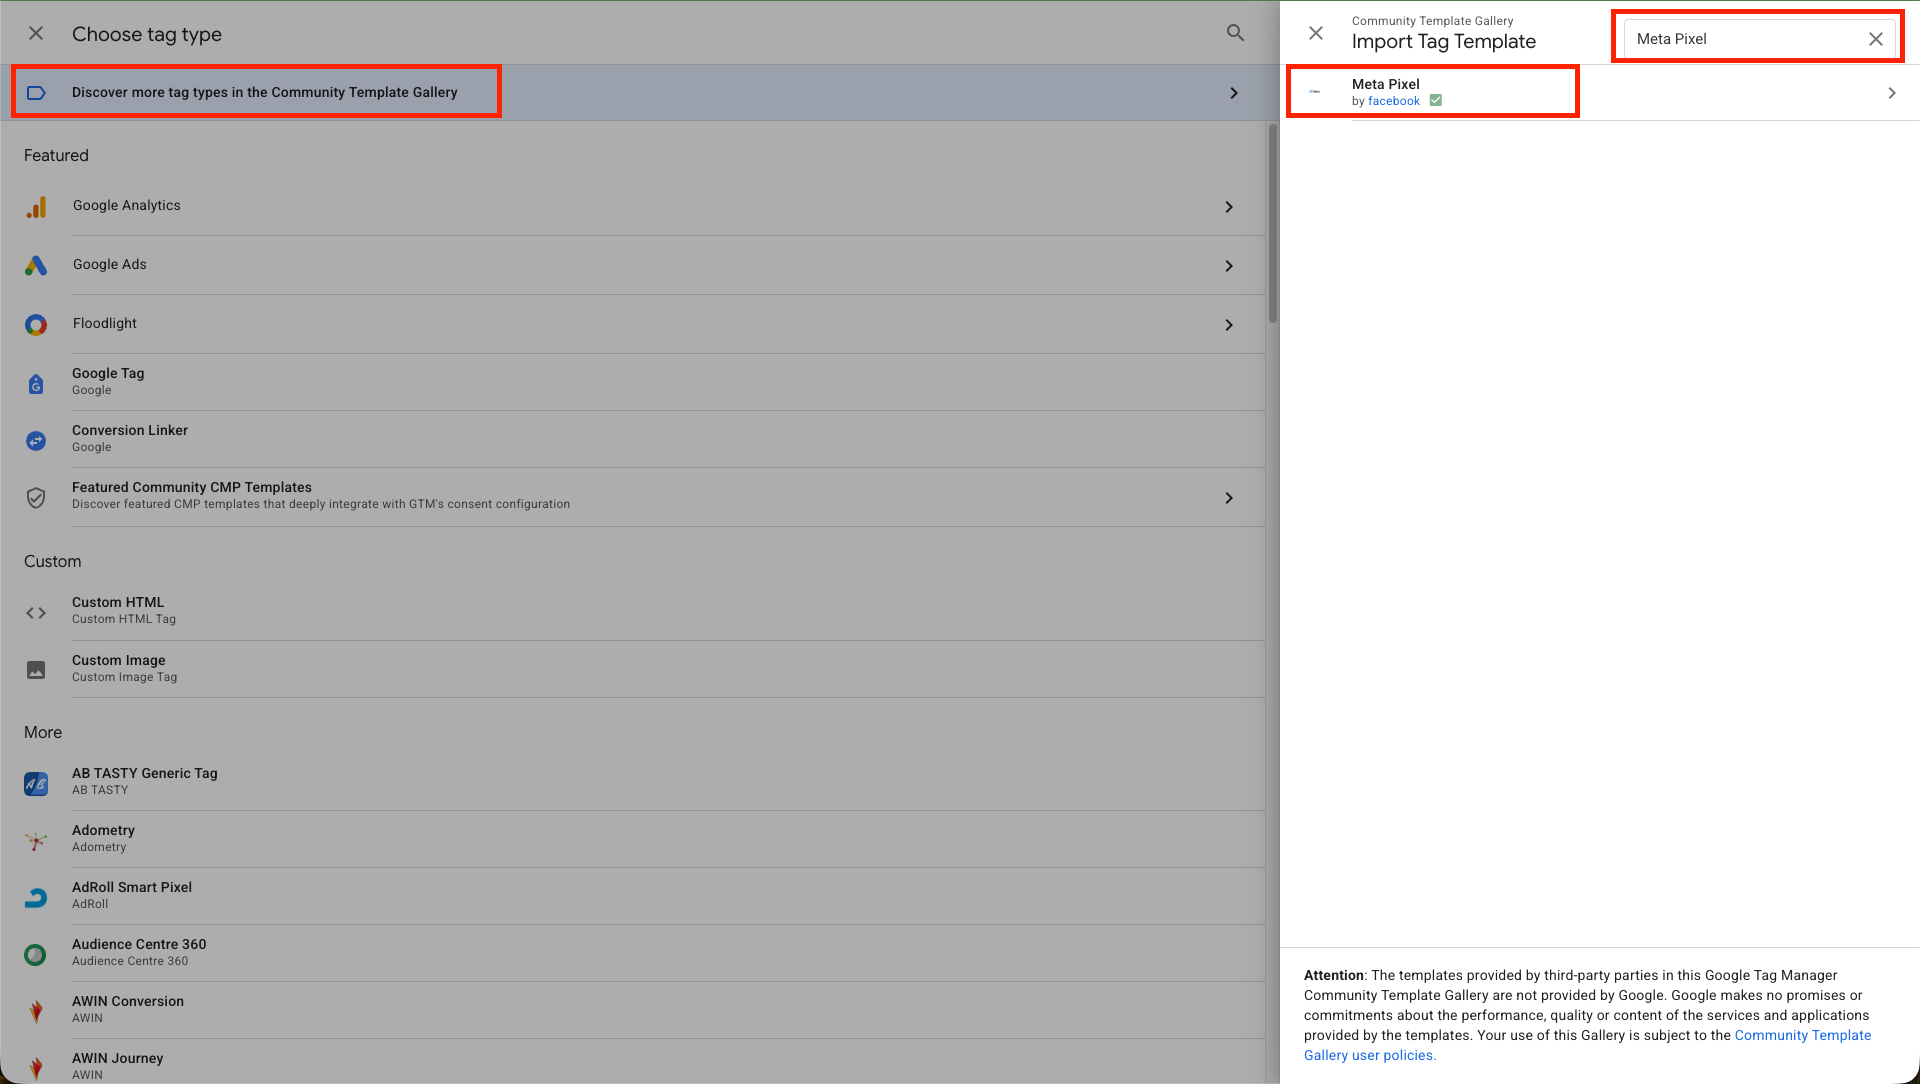
  1. In GTM: Templates → Tag Templates → Search Gallery. Search Meta Pixel and add the template published by Meta. Accept the permissions it asks for.
  2. Tags → New → pick Meta Pixel from the template list instead of Custom HTML.
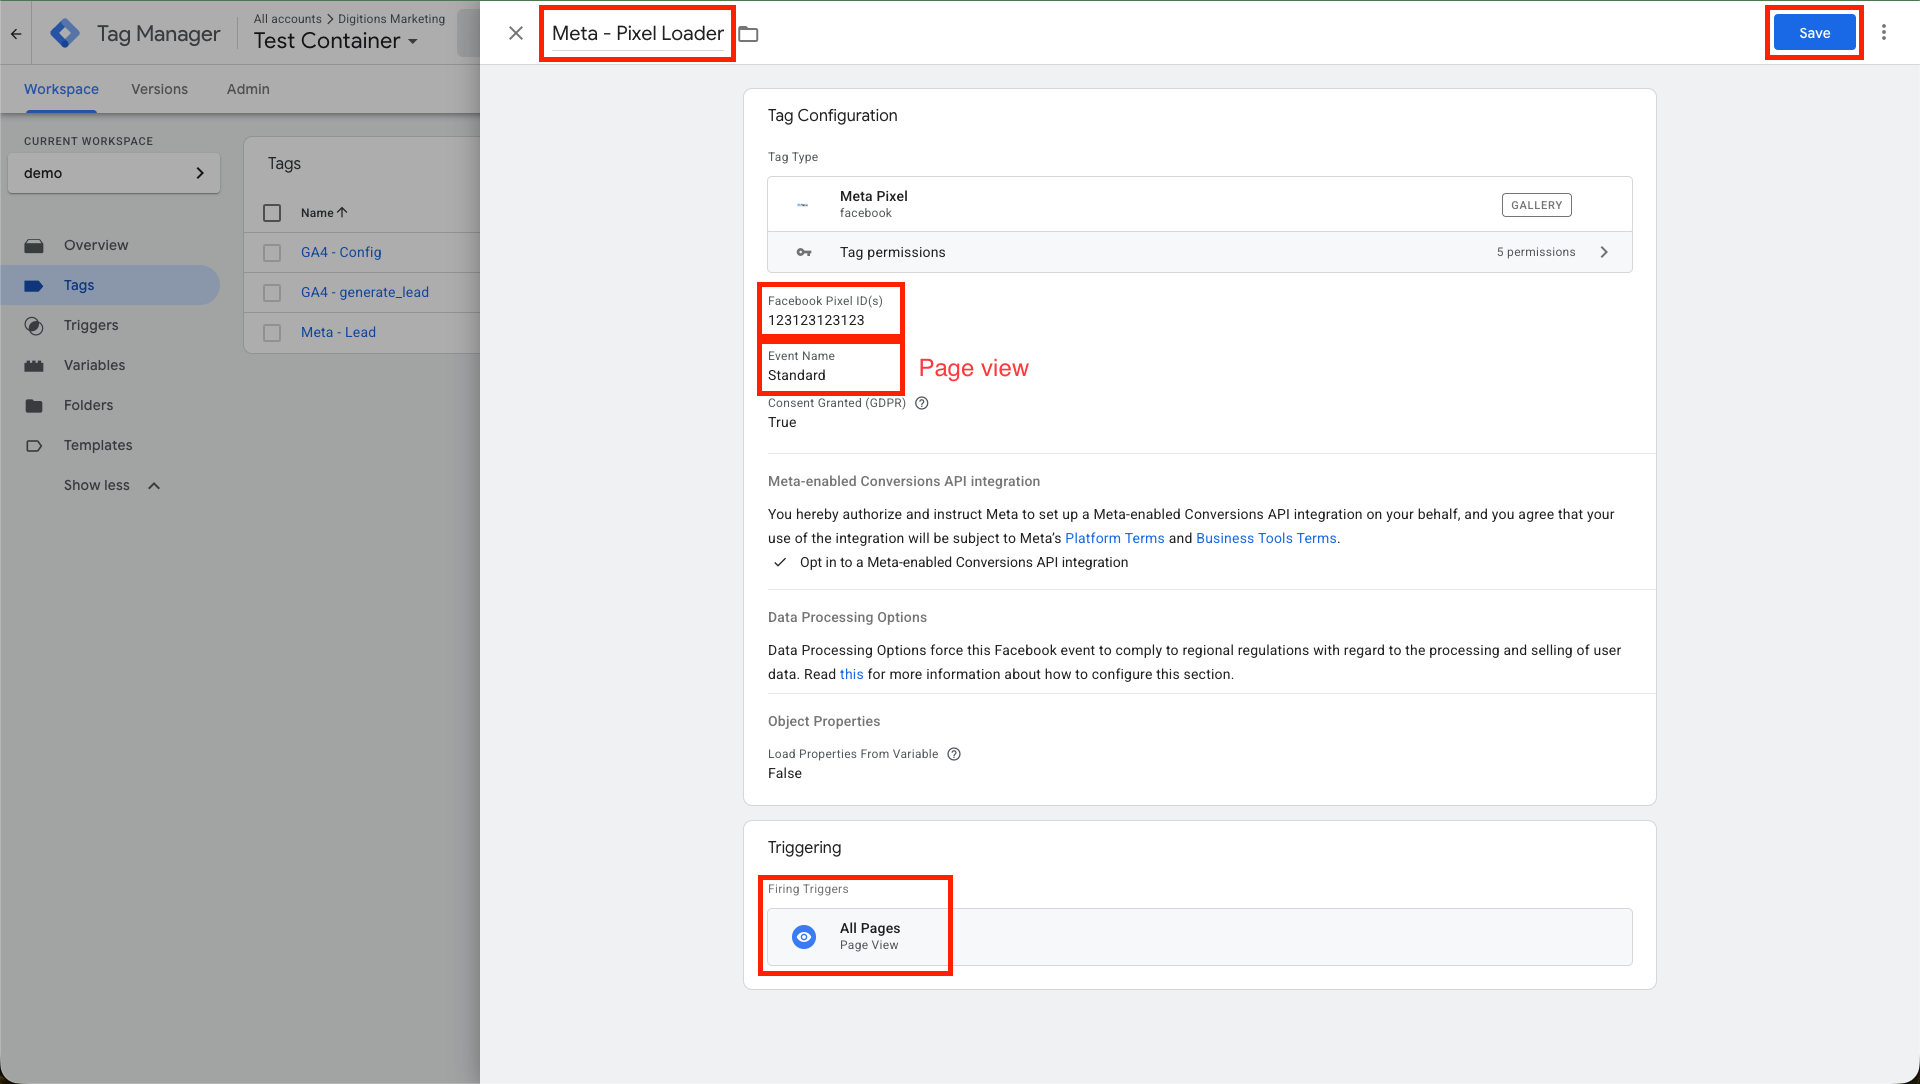
  3. Paste your pixel ID 000000000000000 into the pixel ID field. Event: PageView.
  4. Leave Advanced Matching off for now — it sends hashed customer details and needs a privacy-policy line first.
  5. Trigger: All Pages. Name it Meta — Pixel Loader and save.
Nothing to paste, and one less thing to break. The template loads fbq itself, so there is no base-code snippet to maintain and no firing-priority juggling later. It also runs inside GTM’s sandbox with declared permissions, which consent tools and strict Content-Security-Policy setups handle far better than a Custom HTML tag.
Which template? There are several in the gallery. Take the one whose publisher is Meta — the older facebookarchive one still works but is no longer maintained, and third-party copies are a supply-chain risk you do not need.
  1. In GTM: Tags → New → Custom HTML. Paste the base code below.
  2. Trigger: All Pages. Name it Meta — Base Code and save.
GTM Custom HTML tag · All Pages
<script>
!function(f,b,e,v,n,t,s)
{if(f.fbq)return;n=f.fbq=function(){n.callMethod?
n.callMethod.apply(n,arguments):n.queue.push(arguments)};
if(!f._fbq)f._fbq=n;n.push=n;n.loaded=!0;n.version='2.0';
n.queue=[];t=b.createElement(e);t.async=!0;t.src=v;
s=b.getElementsByTagName(e)[0];s.parentNode.insertBefore(t,s)}
(window,document,'script','https://connect.facebook.net/en_US/fbevents.js');

fbq('init', '000000000000000');
fbq('track', 'PageView');
</script>
Only worth it if the template cannot do the job. Use this lane when your container blocks gallery templates, or you need a parameter the template does not expose. Everything else about the build stays identical.
Meta Events Manager, Datasets view. The dataset is highlighted in the list with its numeric ID beneath the name, and the same Dataset ID is repeated in the details panel on the right alongside Integrations and Websites. Open full size ↗
What you should see: your dataset listed, with a long numeric ID beneath its name.
Google Tag Manager Choose tag type panel with Discover more tag types in the Community Template Gallery outlined in red, and the Import Tag Template panel open beside it. The search box contains Meta Pixel and the single result, Meta Pixel by facebook with a blue verified badge, is outlined in red. Open full size ↗
What you should see: the gallery result for Meta Pixel, publisher facebook with the blue verified badge next to it. Check the publisher before you add it.
The GTM tag editor for a tag named Meta - Pixel Loader using the Meta Pixel gallery template. Outlined in red are the tag name, the Facebook Pixel ID field, the Event Name set to Standard with a handwritten note reading Page view, and the single firing trigger All Pages. Open full size ↗
What you should see: the tag named Meta — Pixel Loader, your pixel ID filled in, Event Name Standard with Page view picked underneath, and All Pages as the only trigger.
04
Decision point~5 min

Decide how your form tells the page it succeeded

This is the step people skip, and it is the reason most lead tracking is wrong. Before you can record a lead you have to know what moment on your site counts as one. Pick the first option below that matches your site.

Most reliable

A dataLayer push

Your form fires a custom event on success. Works with AJAX forms, multi-step forms and popups. Needs one snippet added by whoever built the form.

Easiest

A thank-you page

The form redirects to a unique URL such as /thank-you. If that page can only be reached after submitting, the page view is the lead.

Last resort

GTM form submission

GTM watches for a native form submit. Breaks silently on most modern form plugins, which never actually submit the form element.

Option A · run this on submit success
<script>
window.dataLayer = window.dataLayer || [];
window.dataLayer.push({
  event: 'form_submit_success',
  form_name: 'contact_form',
  form_location: 'homepage_footer'
});
</script>
Ask your form plugin first. Contact Form 7, WPForms, Gravity Forms, Elementor Forms and HubSpot all publish a documented success hook. Search “your plugin name + dataLayer” before writing anything custom.
05
In Google Tag Manager~10 min

Build the trigger that catches that moment

One trigger. Both the GA4 and the Meta conversion tags will hang off it, so they can never disagree about what a lead is.

  1. If you chose the dataLayer push: Triggers → New → Custom Event. Event name: form_submit_success. Fires on: All Custom Events.
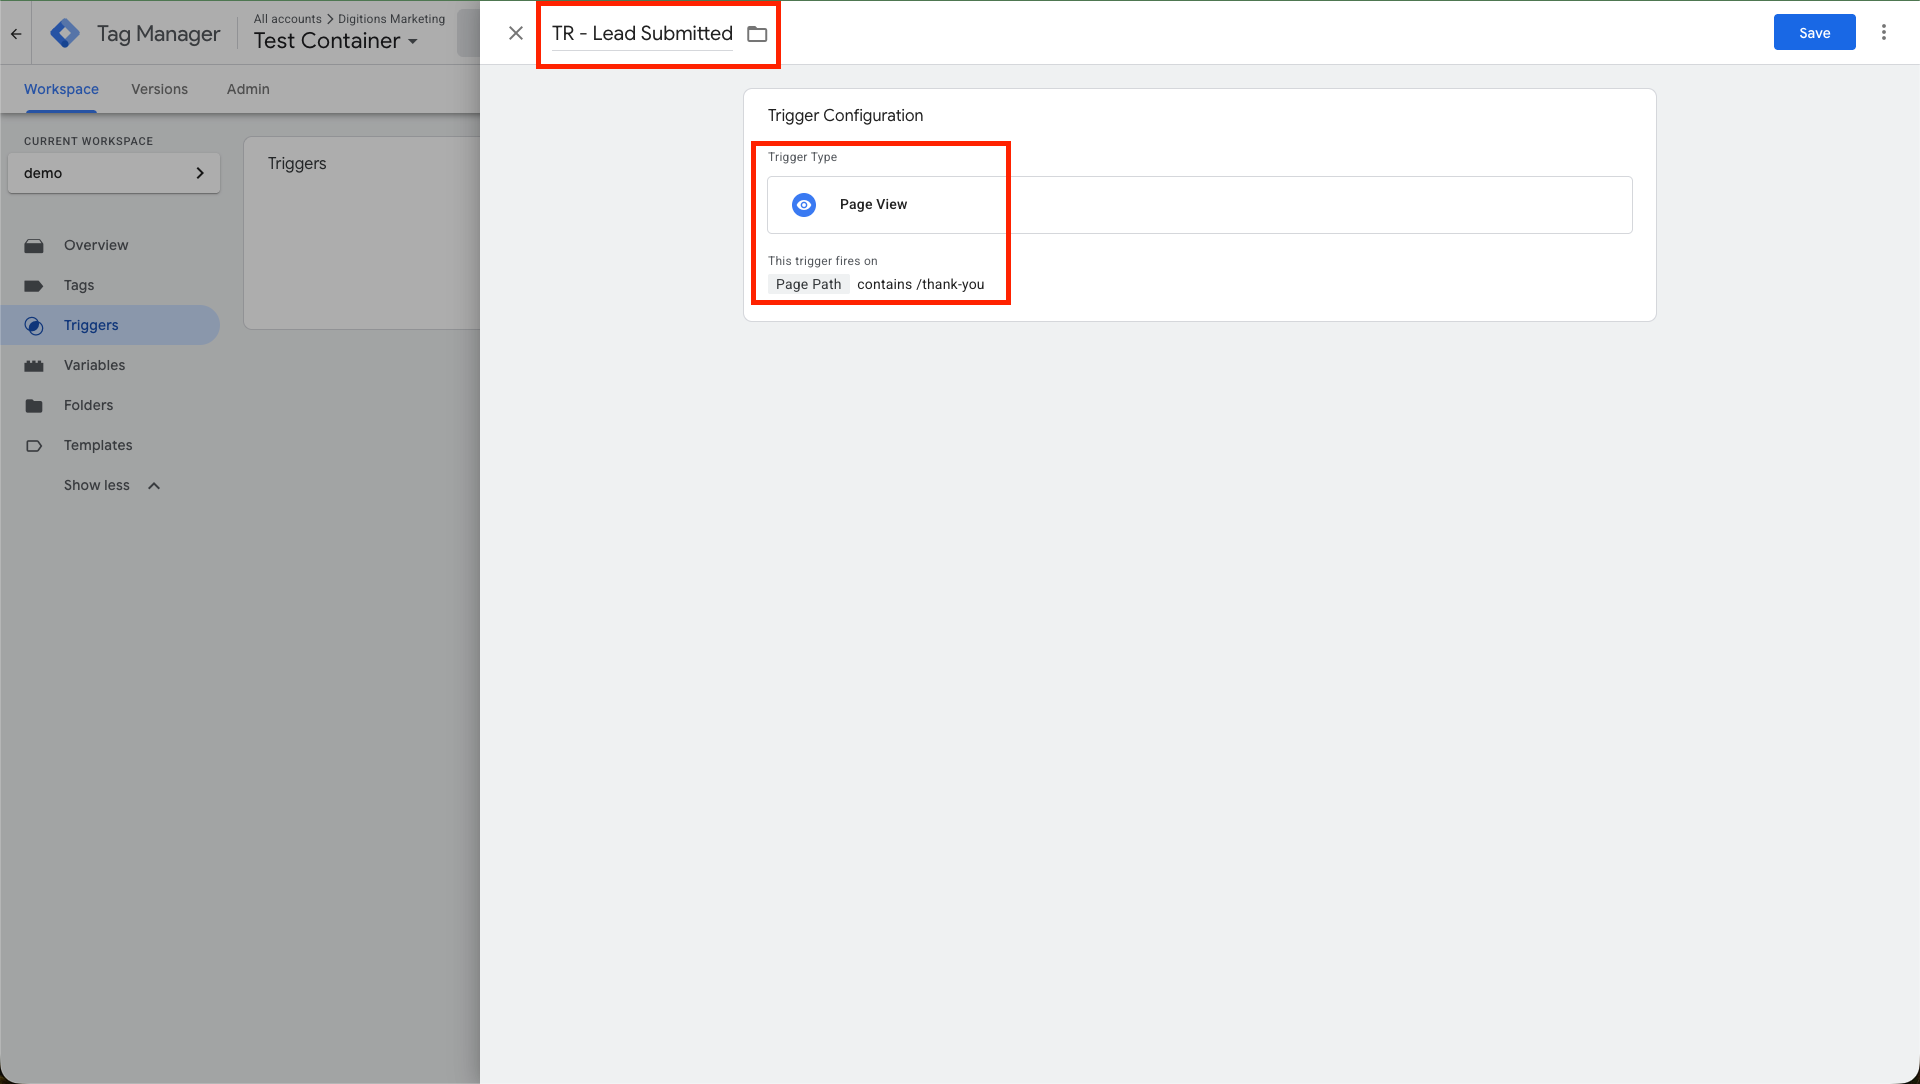
  2. If you chose the thank-you page: Triggers → New → Page View. Fire on Some Page Views where Page Path contains /thank-you.
  3. If you chose form submission: Triggers → New → Form Submission, tick Check Validation, and limit it to the page holding the form.
  4. Name it TR — Lead Submitted so it is obvious later.
  5. Create two Data Layer Variables, DLV — form_name and DLV — form_location, matching the keys you pushed.
Naming pays off. A container with TR —, DLV — and GA4 — prefixes is readable a year from now. One with “Tag 4 copy” is not.
The GTM trigger editor for a trigger named TR - Lead Submitted. Trigger type is Page View, and it fires on the condition Page Path contains /thank-you. Both the name and the configuration are outlined in red. Open full size ↗
What you should see: trigger type, the event name or URL rule, and the trigger's name.
06
GA4 + Meta~15 min

Create the two conversion tags

Both tags use the trigger you just built. GA4 gets a generate_lead event; Meta gets its standard Lead event.

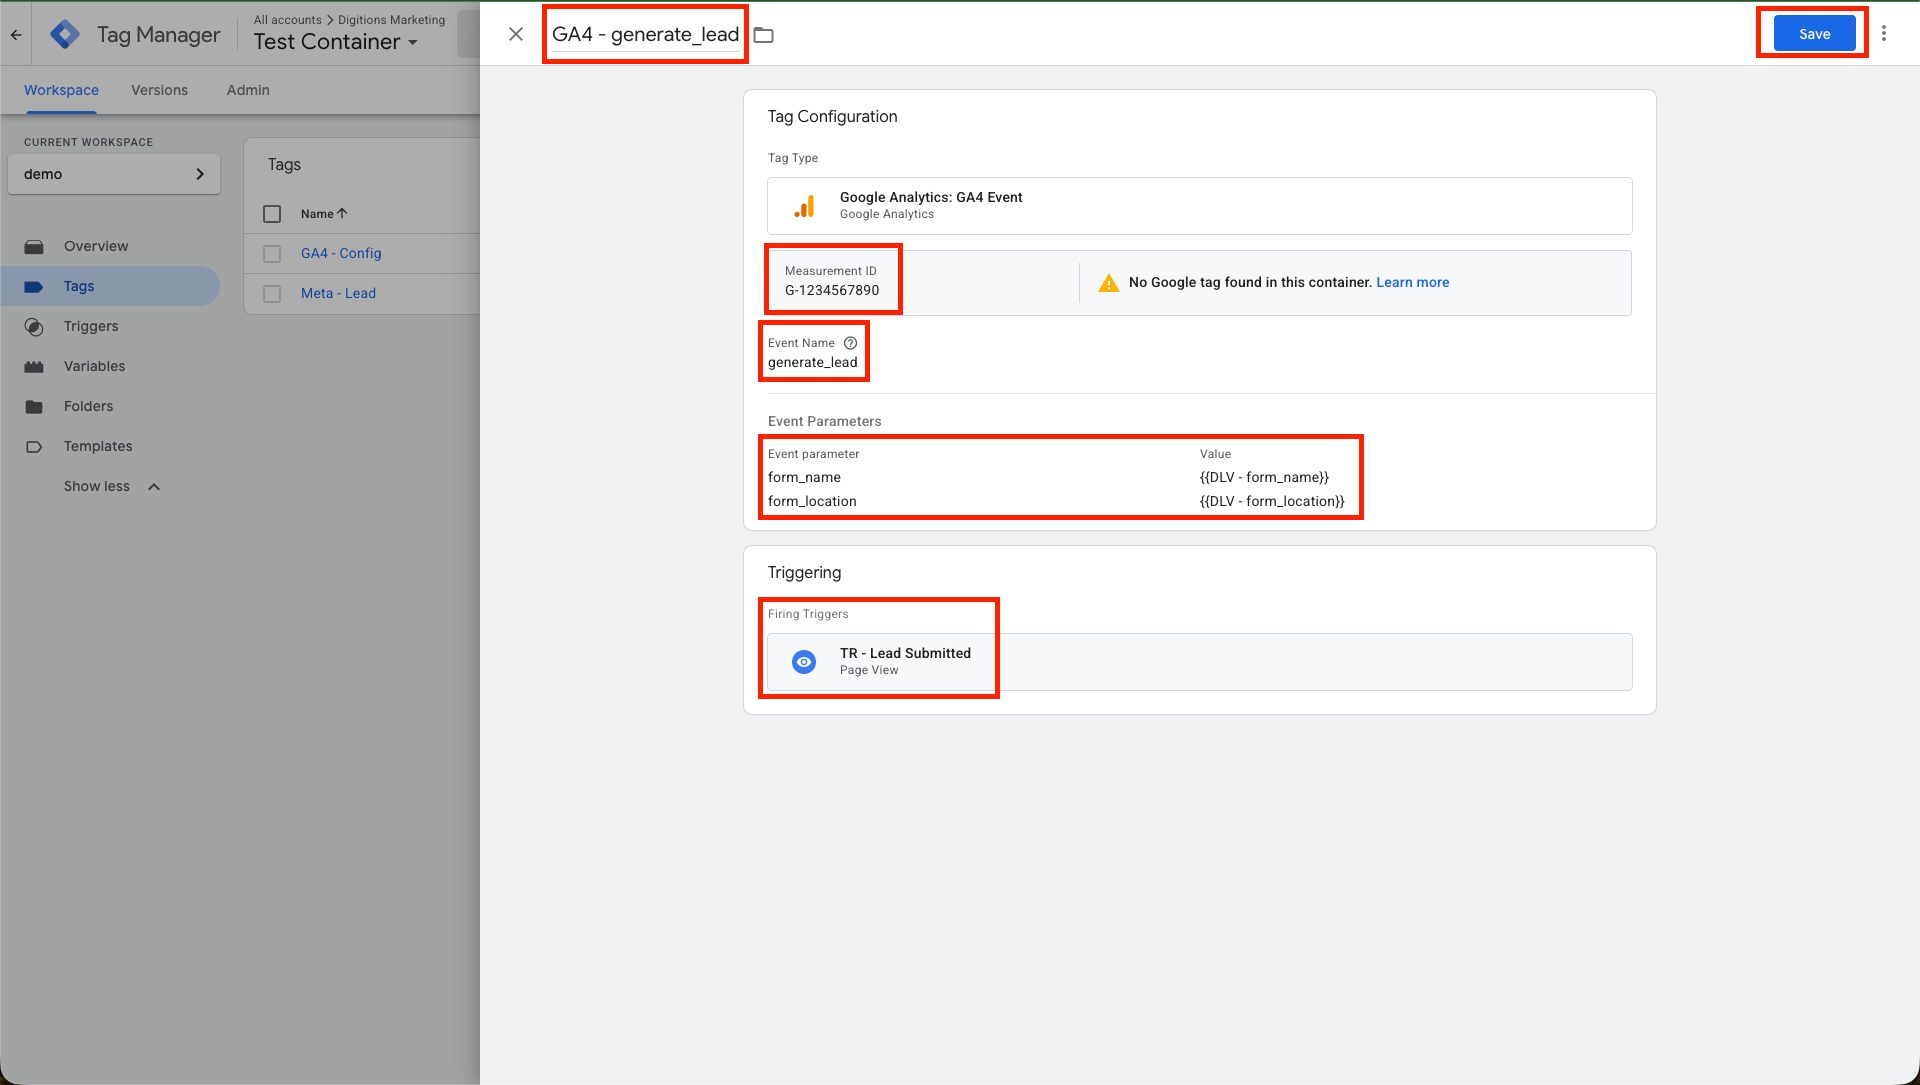
  1. Tags → New → Google Analytics: GA4 Event. Measurement ID: G-XXXXXXXXXX. Event name: generate_lead.
  2. Add event parameters form_name and form_location, set to your two data layer variables.
  3. Attach TR — Lead Submitted. Name the tag GA4 — generate_lead.

Then the Meta tag

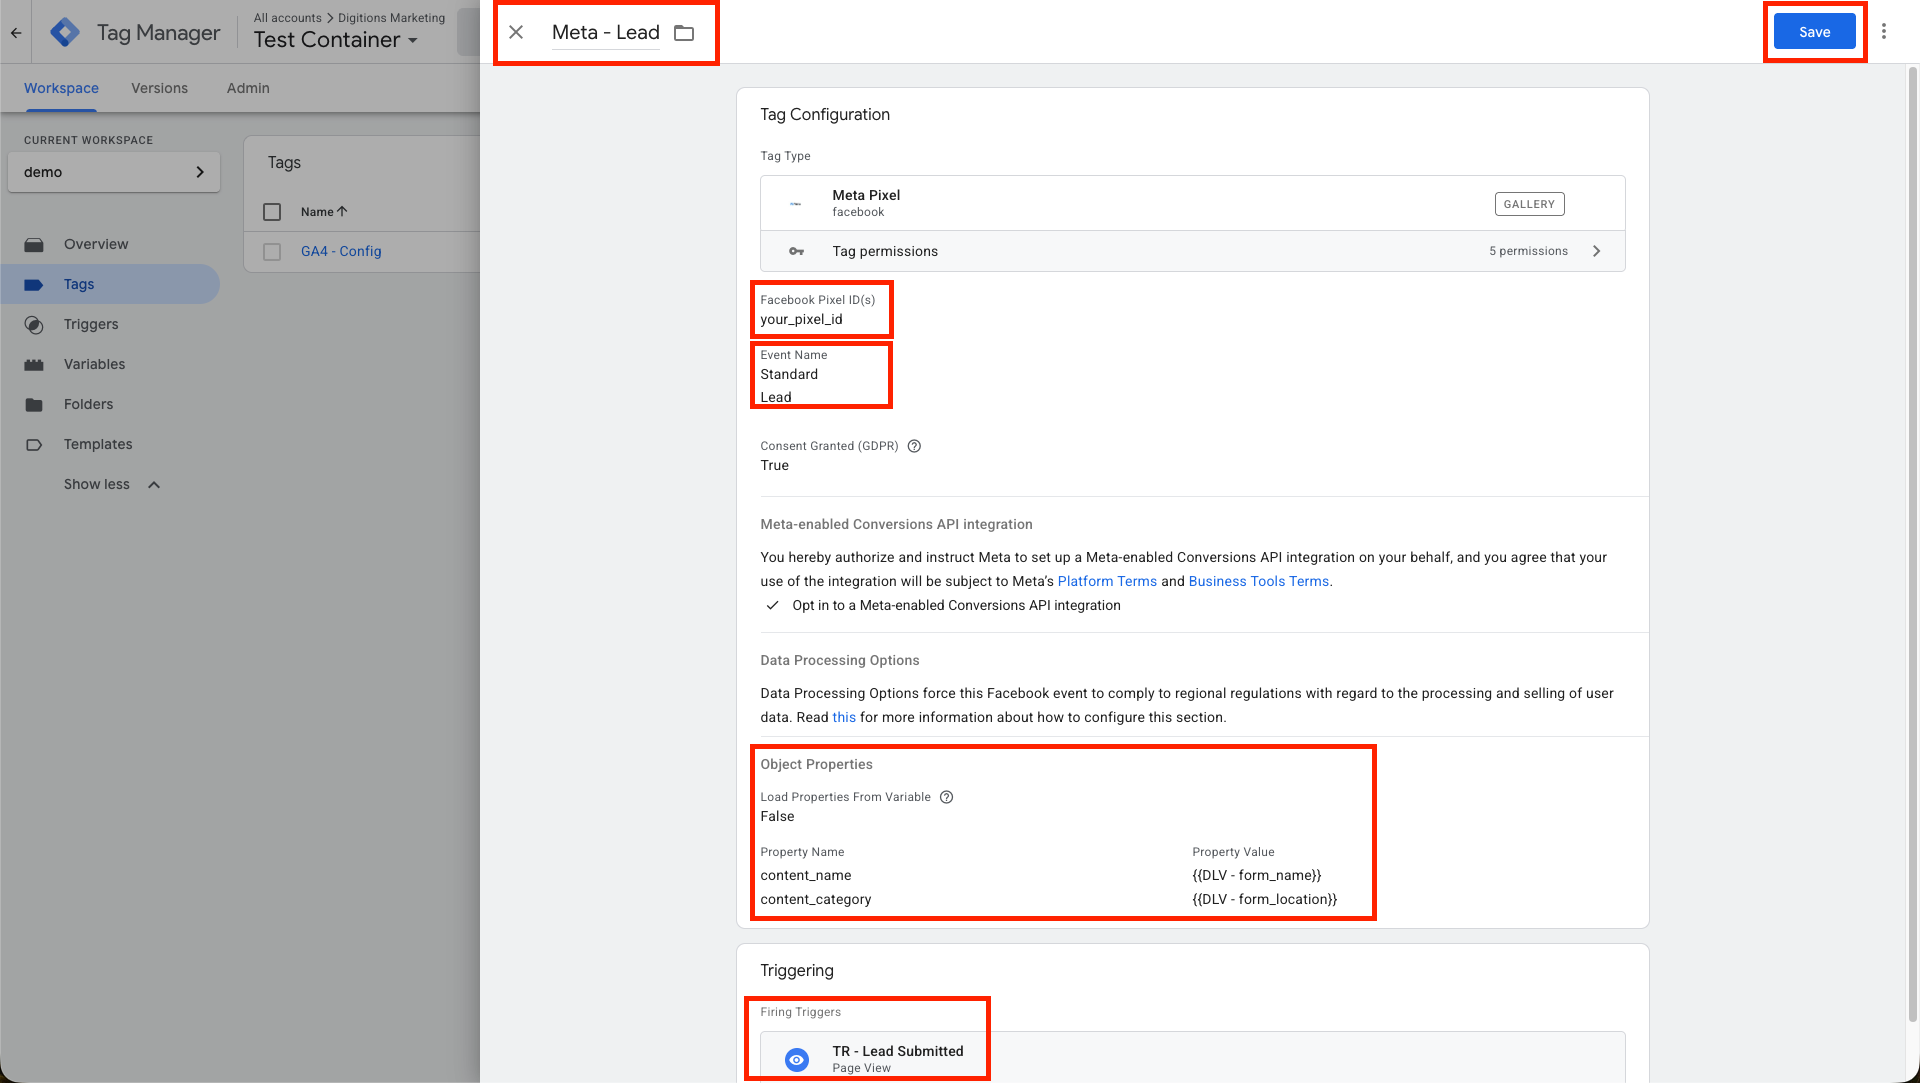
  1. Tags → New → Meta Pixel — the same template you added in Step 3. Pixel ID: 000000000000000.
  2. Event: pick the standard event Lead from the dropdown. Do not type a custom name — Meta only optimises against its standard events.
  3. In the object properties / event parameters section, add these two rows:
Meta Pixel template · object properties
content_name      {{DLV - form_name}}
content_category  {{DLV - form_location}}
  1. Trigger: TR — Lead Submitted. Name the tag Meta — Lead and save.
No firing priority needed. The template loads the pixel itself if the loader tag has not run yet, so the Lead event cannot fire into a void. That whole class of “pixel not ready” bug disappears with this lane.
  1. Tags → New → Custom HTML for Meta, using the snippet below, on the same trigger. Name it Meta — Lead.
  2. In the Meta tag's Advanced Settings, set Tag firing priority below the base code so the pixel is loaded before this runs.
GTM Custom HTML · TR — Lead Submitted
<script>
fbq('track', 'Lead', {
  content_name: '{{DLV - form_name}}',
  content_category: '{{DLV - form_location}}'
});
</script>
Keep the quote marks. In a Custom HTML tag GTM pastes the variable’s raw value in, unquoted. Without the surrounding ' marks, content_name: {{DLV - form_name}} becomes content_name: contact_form — a JavaScript error, and the whole Lead event is lost. The gallery template lane does not have this problem.
Put a real number on it, or leave it out. If you know roughly what a lead is worth — average deal value multiplied by your close rate — add value and currency rows to the tag, for example 250.00 and MYR. Both platforms optimise harder when conversions carry a value. If you do not know the number, leave both out entirely: a value of 0.00 is worse than no value at all, because it tells Meta the conversion is worth nothing, reports zero return on ad spend, and rules out value-based bidding.
The GTM tag editor for a tag named GA4 - generate_lead. Tag type is Google Analytics: GA4 Event. Outlined in red are the tag name, the Measurement ID, the Event Name generate_lead, the two event parameter rows form_name and form_location set to the DLV variables, and the single firing trigger TR - Lead Submitted. Open full size ↗
What you should see: event name, the parameter rows, and one trigger attached at the bottom.
The GTM tag editor for a tag named Meta - Lead using the Meta Pixel gallery template. Outlined in red are the tag name, the Facebook Pixel ID field, the Event Name set to Standard then Lead, the Object Properties rows content_name and content_category set to the DLV variables, and the firing trigger TR - Lead Submitted. Open full size ↗
What you should see: the pixel ID, Lead picked under the Standard event type, the two object property rows, and TR — Lead Submitted attached.
07
Debug mode~15 min

Watch it fire in the browser before you publish anything

Both extensions you installed in the prerequisites earn their keep here. Tag Assistant shows you what GTM did; Meta Ads Data Advisor — the extension formerly called Meta Pixel Helper — shows you what actually left the page for Meta. Work through these in order.

  1. In GTM click Preview, enter your site URL, and submit your form for real in the window that opens.
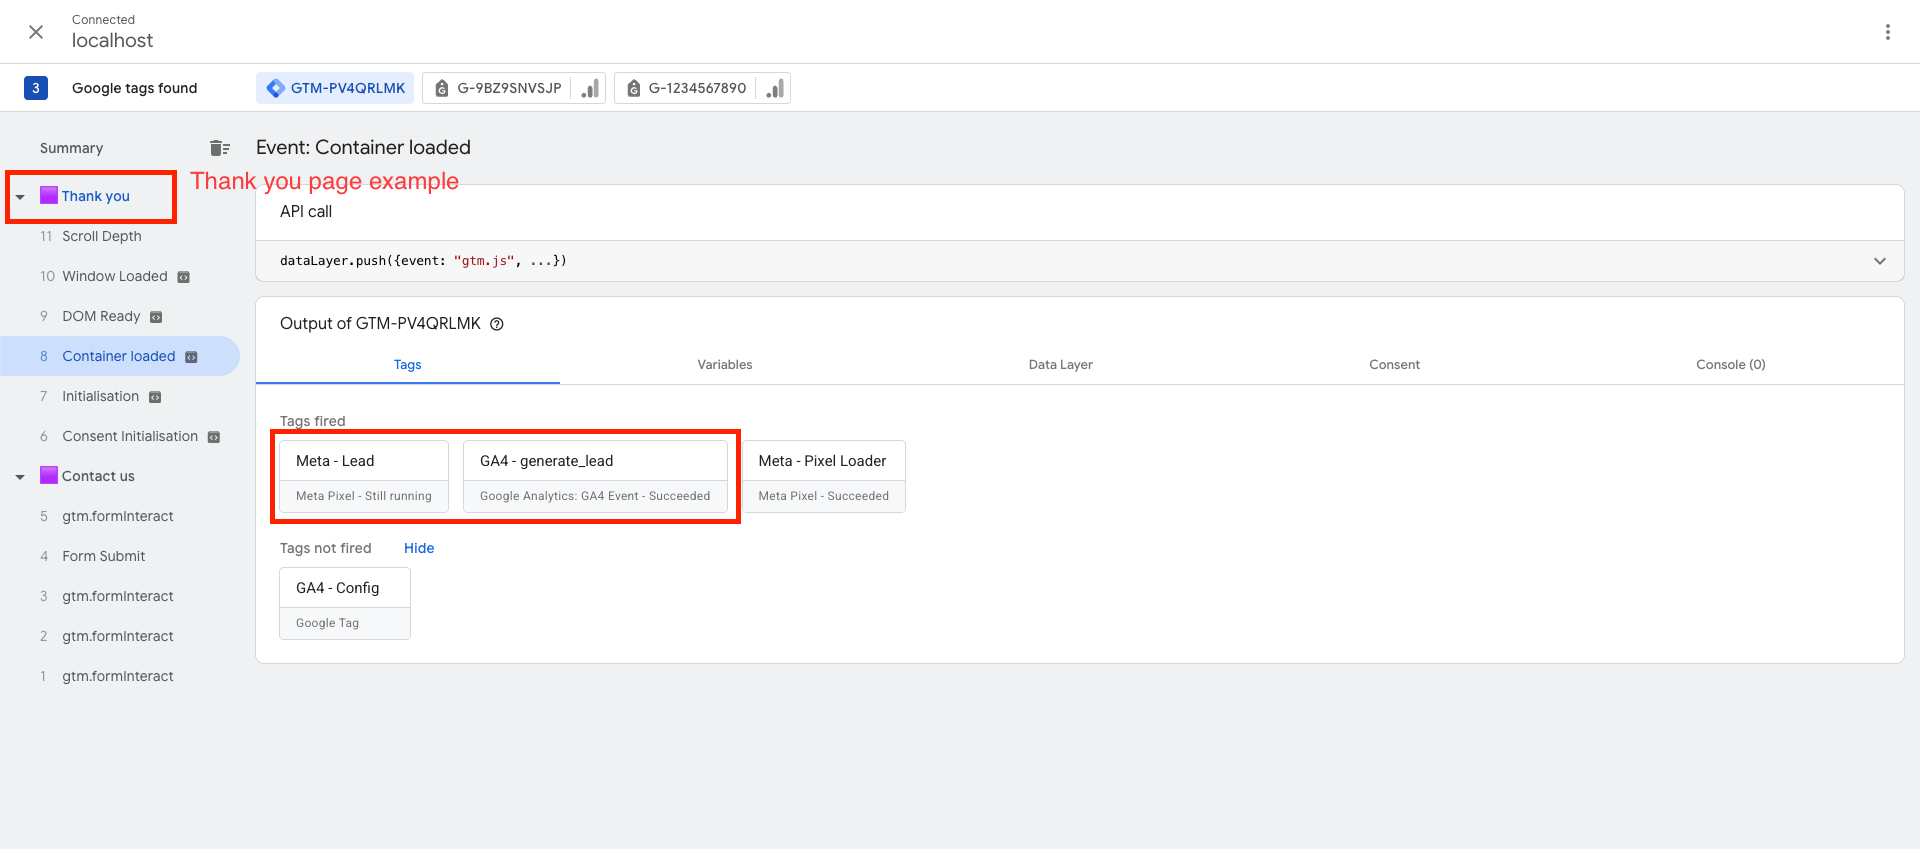
  2. In Tag Assistant, select the submit event in the left-hand timeline — form_submit_success, or the thank-you page view — and confirm GA4 — generate_lead and Meta — Lead both sit under Tags Fired.
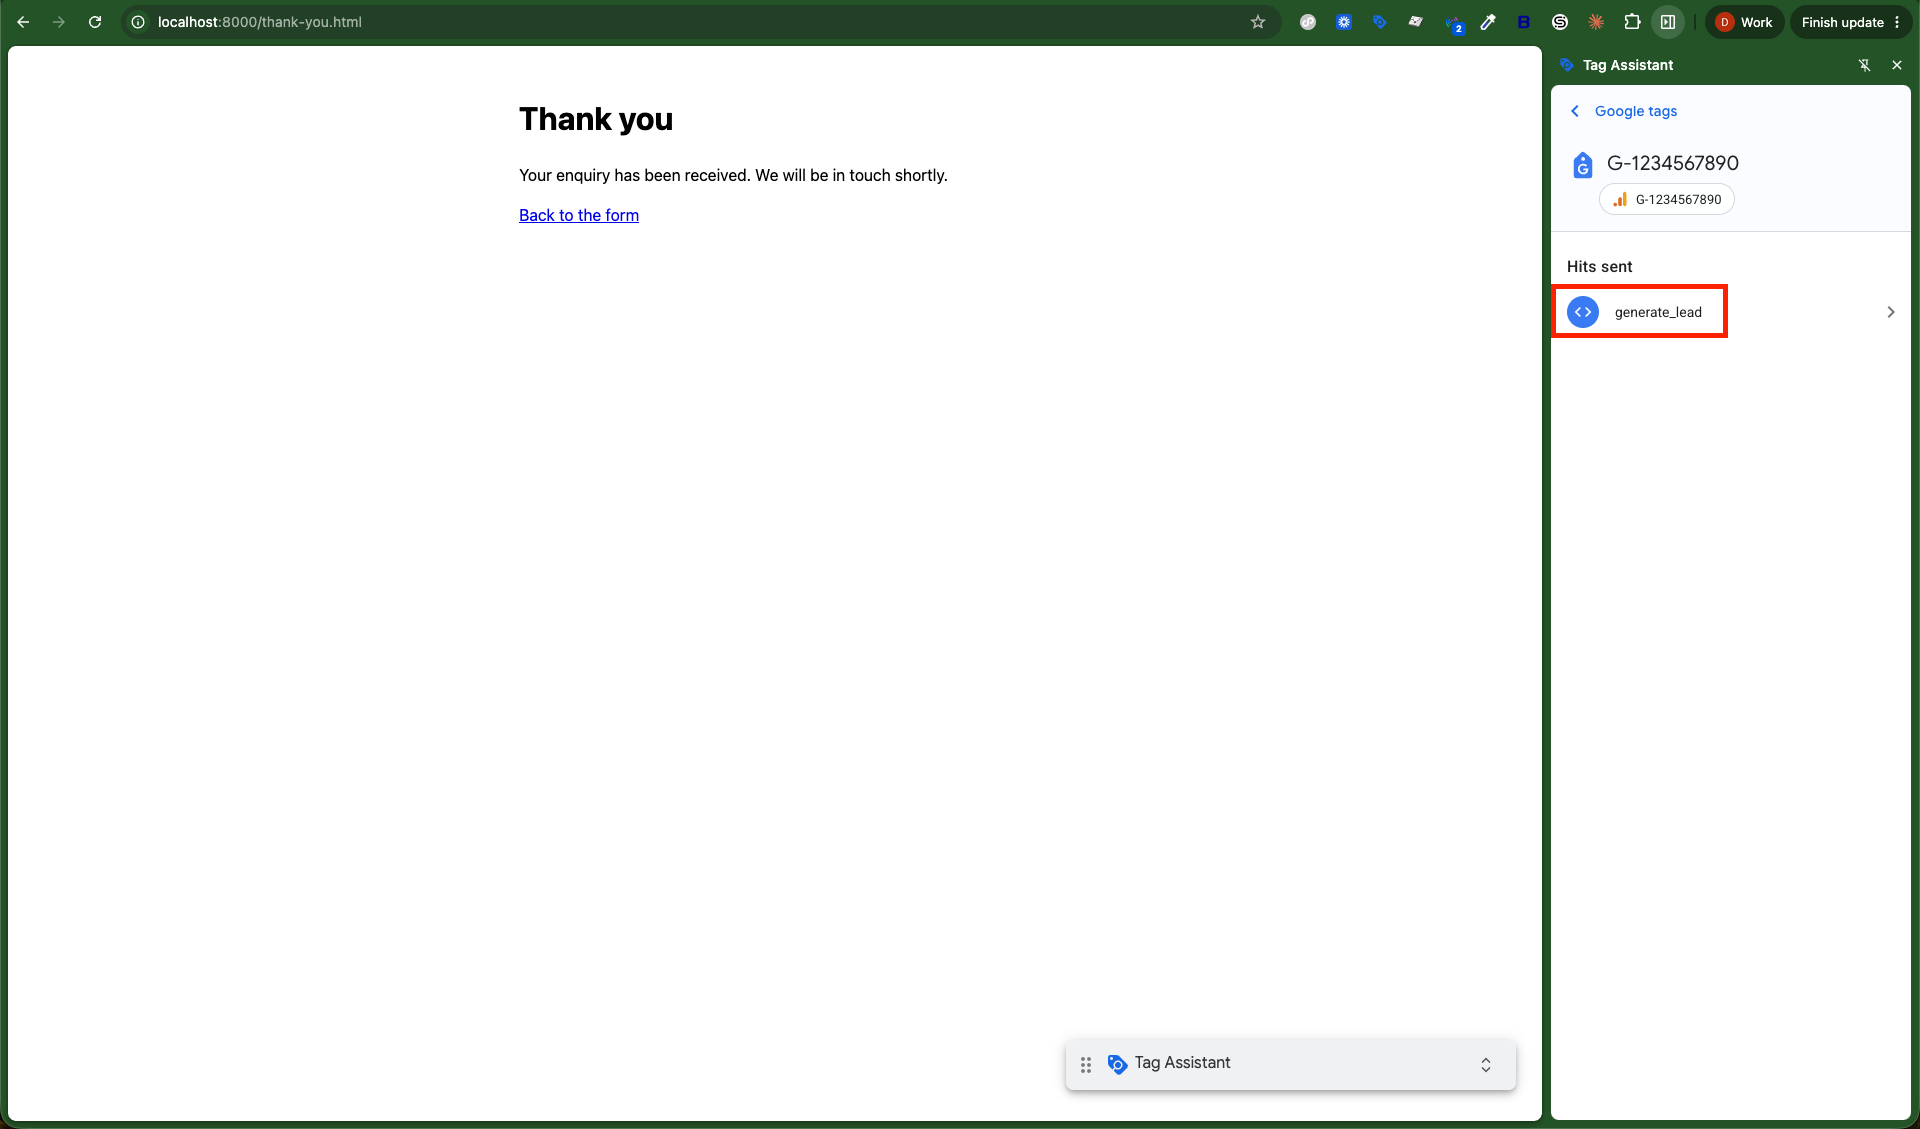
  3. Open the Tag Assistant side panel on the page the lead lands on. Under Hits sent you should see generate_lead against your measurement ID — click it and check form_name and form_location carry real values, not undefined. A blank value means the data layer variable name does not match the key you pushed — back to Step 5.
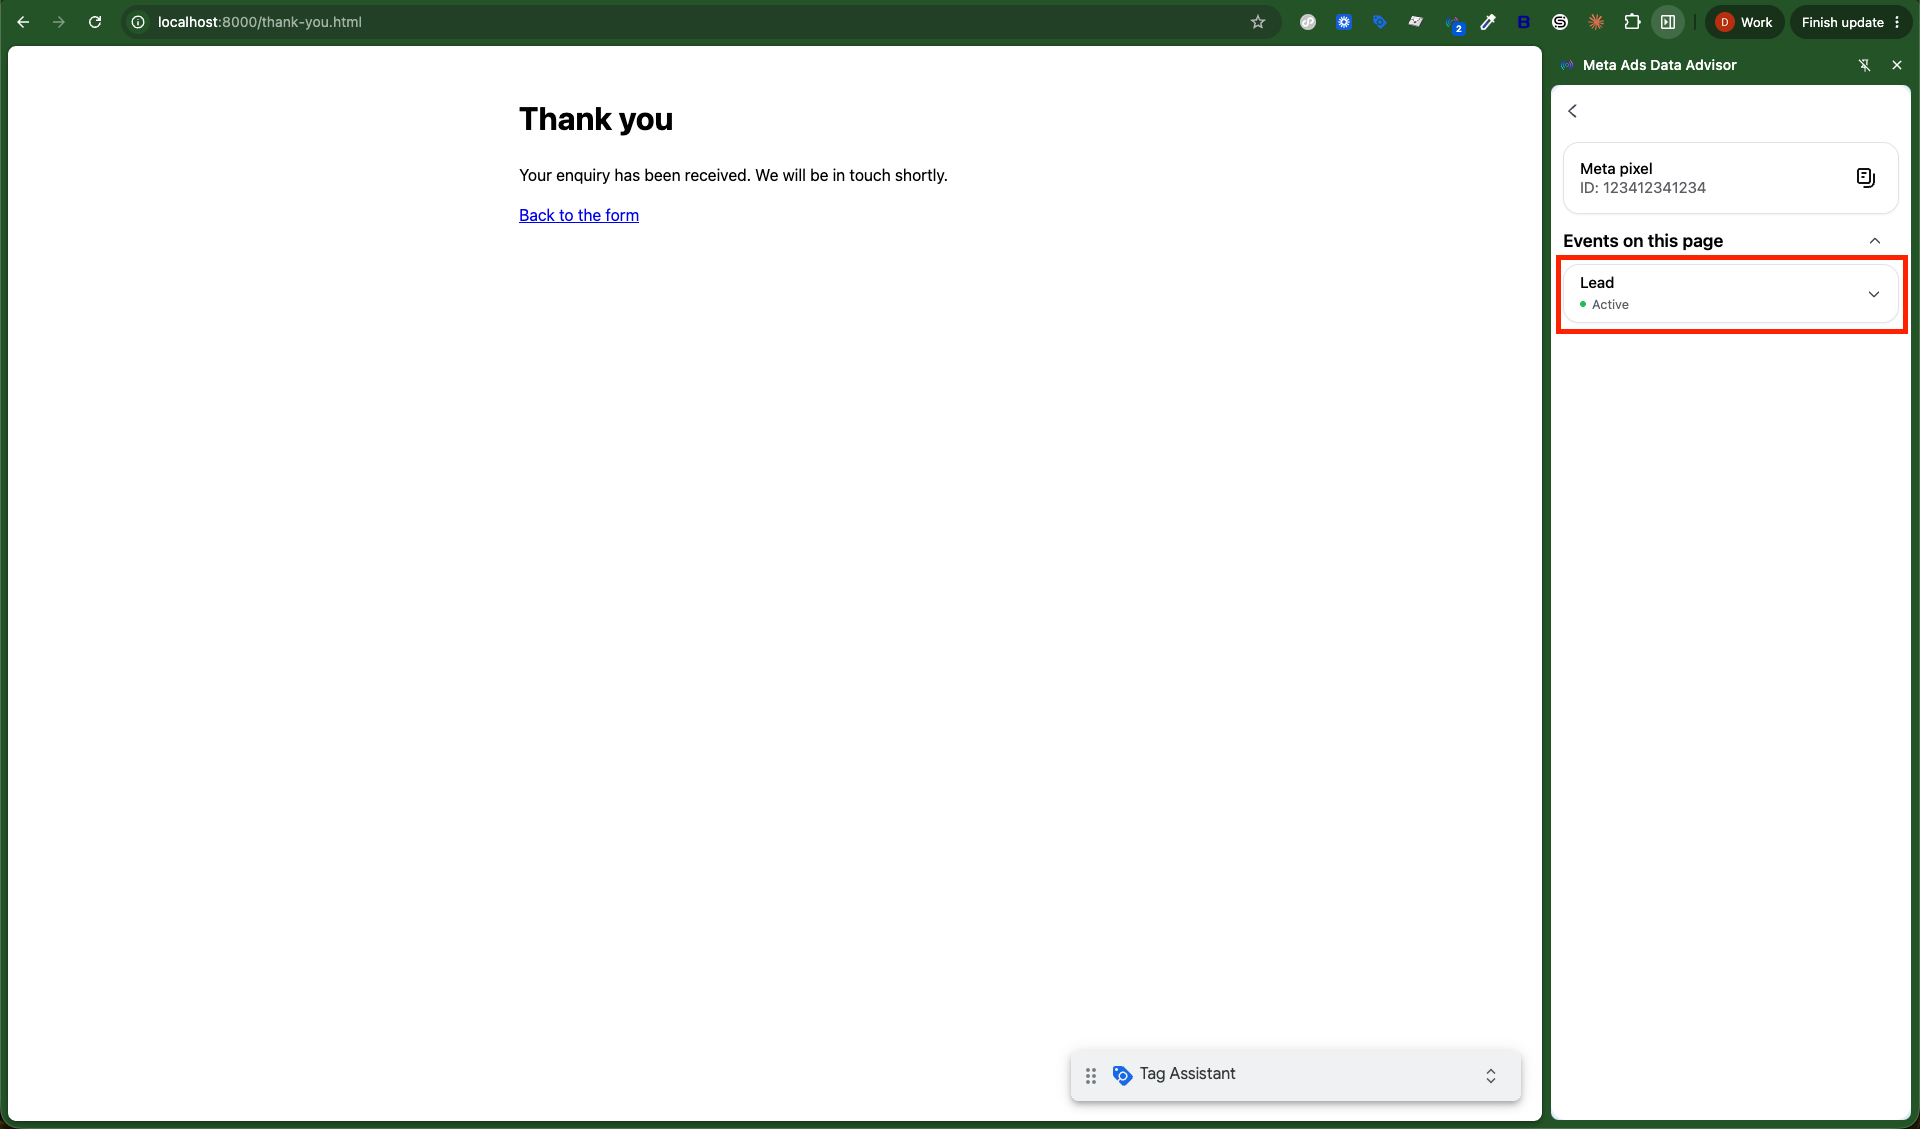
  4. Open Meta Ads Data Advisor on the same page. Under Events on this page it should list Lead marked Active beneath your pixel ID; expand it for content_name and content_category. No pixel found, or no Lead row, means the tag never ran.
  5. Now browse the site normally for two minutes without submitting. Both extensions should stay quiet. If either records a lead, your trigger is too loose — back to Step 5.
The false-positive test is the important one. A trigger that fires on every page view will happily report a hundred leads a day and quietly ruin every campaign decision you make for the next quarter.
On a phone, use the Preview link. Neither extension exists on mobile. Open the GTM Preview URL in your phone’s browser instead — the Tag Assistant window on your desktop keeps showing what fires, so you can watch a mobile submit from the laptop.
What this does not prove. Both extensions read the browser, so they confirm the event was sent correctly — not that GA4 and Meta filed it. A pixel ID pointing at the wrong dataset still looks green here. Step 8 is where you confirm each platform actually received it.
The Tag Assistant preview window. In the left-hand event timeline the Thank you page load is outlined in red and annotated Thank you page example. On the right, under Tags fired, the tags Meta - Lead and GA4 - generate_lead are outlined in red, with Meta - Pixel Loader beside them and only GA4 - Config under Tags not fired. Open full size ↗
What you should see: your submit event selected on the left, and both GA4 — generate_lead and Meta — Lead under Tags fired.
The thank-you page with the Tag Assistant side panel open in Chrome. The panel shows the GA4 measurement ID and, under Hits sent, a generate_lead row outlined in red. Open full size ↗
What you should see: generate_lead under Hits sent for your measurement ID. Click the row to open the hit and read its parameters.
The thank-you page with the Meta Ads Data Advisor side panel open in Chrome. The panel shows the Meta pixel and its ID, and under Events on this page a Lead row marked Active is outlined in red. Open full size ↗
What you should see: your pixel ID at the top and one Lead event marked Active under Events on this page. Expand it to check the parameters.
08
Go live~10 min

Publish, then tell each platform this event matters

A tag that works in Preview is still invisible to the world until you publish the container. After that, both platforms need to be told the event is a conversion, not just a statistic.

  1. In GTM click Submit. Give the version a real description: what you added and why. Publish.
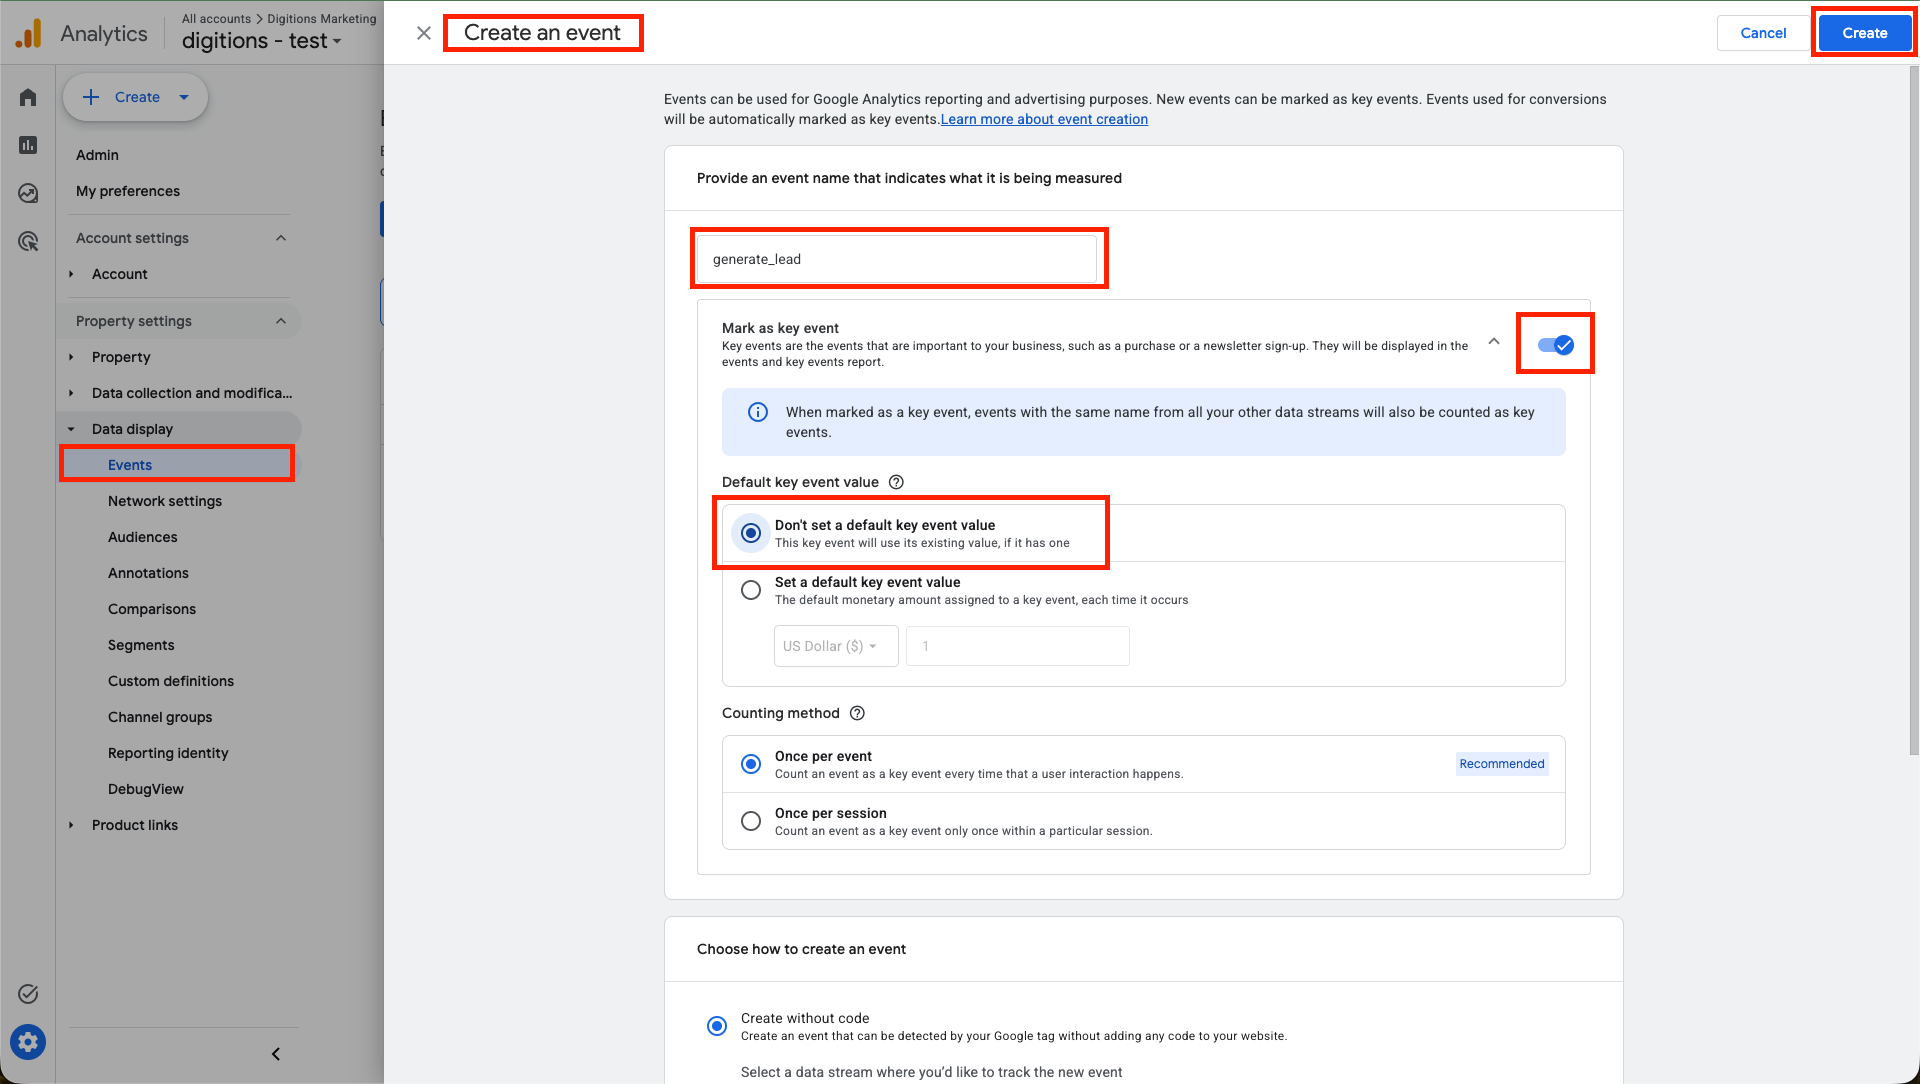
  2. In GA4 go to Admin → Data display → Events and click Create event. An event GA4 has not received yet will not be in the list, so there is nothing to toggle — you name it here instead.
  3. Event name: generate_lead. Switch Mark as key event on. Leave Default key event value on Don’t set a default key event value and Counting method on Once per event, then click Create.
  4. In Meta Events Manager, check the Lead event is listed as active and rank it in Aggregated Event Measurement if you run iOS traffic.
  5. If you run Google Ads, link GA4 to Ads and import generate_lead as a conversion action.
  6. Diarise a check for seven days from now: compare the count of leads in each platform against the actual enquiries in your inbox.
Do not give it matching conditions. Further down that panel, Choose how to create an event offers to build the event from another one. Your GTM tag already sends generate_lead, so a second definition matching your thank-you page would count every lead twice. You are here only to register the name and the key event switch. Once GA4 has received a real generate_lead, the event shows up in the Events list on its own and you can manage the toggle from there.
The numbers will not match exactly, and that is normal. Ad blockers, consent refusals and iOS privacy rules mean GA4 and Meta will each report slightly fewer leads than your inbox. Being within 10–20 percent is a healthy setup. Being off by half means something is broken.
GA4 Admin, Data display, Events, with the Create an event panel open. Outlined in red are the Events menu item, the event name generate_lead, and the Mark as key event toggle switched on, alongside the default key event value and counting method options. Open full size ↗
What you should see: generate_lead with Mark as key event in the on position.

Reference

Where to check what

Keep this table open while you debug. Each platform reports in a different place, on a different delay.

What you are checkingWhere to lookExpect to seeDelay
Container is installedTag Assistant extensionYour GTM- ID detected on the pageInstant
Tags fire on submitGTM › PreviewBoth tags under Tags FiredInstant
GA4 event carries its parametersTag Assistant › tag detailform_name and form_location filled inInstant
Meta event leaves the browserMeta Ads Data Advisor extensionLead under your pixel IDInstant
GA4 actually received itGA4 › Admin › DebugViewgenerate_lead in the timelineSeconds
Meta actually received itEvents Manager › Test EventsLead, browser sourceSeconds
Real traffic is recordingGA4 › RealtimeLive users and eventsUnder a minute
Event is a conversionGA4 › Admin › EventsKey event toggle onUp to 24 hours
Reports are populatedGA4 › Reports › EngagementEvent counts by day24–48 hours
Pixel qualityEvents Manager › OverviewEvent match quality scoreA few days

Troubleshooting

The six things that go wrong

Nearly every broken setup we are asked to repair is one of these.

The container was never published

Everything worked in Preview, nothing works live. Preview mode only runs in your own browser. Click Submit, then Publish.

GA4 is installed twice

Once in the theme and once in GTM. Sessions, users and leads all double. Remove the hard-coded one and keep GTM.

The thank-you page is public

If /thank-you is linked in the menu or indexed by Google, every stray visit counts as a lead. Add noindex and remove it from navigation.

The form never actually submits

Most modern form plugins submit over AJAX, so GTM's Form Submission trigger never sees anything. Use the dataLayer push instead.

Personal data in the parameters

Sending an email address or phone number as a plain event parameter breaks both platforms' terms and can get your property suspended. Send the form name, never the answers.

The consent banner blocks everything

If you run a cookie banner, tags fire only after consent. Configure Consent Mode in GTM rather than assuming the banner and the tags will agree.

Phase 09

Final check before you call it done

Run this list a week after publishing, with real traffic flowing. If every box ticks, your lead data is trustworthy enough to spend money on.